Navigation

Wednesday, October 8, 2014

Favorite Kitchen Tools


"I've got gadgets and gizmos a plenty...." -my girl Ariel

via

Errrmmm, moving on.... Here are a few of my favorite kitchen gadgets/tools!  I figured I should start making some notes on what I like and don't like to use on the regular and tell all 10 of you about it!!! Which, by the way, thank you for humoring me by reading this blog.

I'll start with the big stuff: These are the mac-daddy kitchen essentials. Technically, you don't need these but they sure do make life a lot easier when cooking for your fam.


1. Kitchen Aid Mixer. LOOK AT ALL THE PRETTY COLORS THEY HAVE NOW. Y'all know what's up with this. I use this at least 3 times a week for pizza dough, pasta dough rolling and mixing, any excuse I have for using it, I usually do. I'm really interested in the ice cream maker attachment for it. Can you imagine!?!?!? I'd really be hurtin for a personal trainer then.

 via 


2. Food Processor - This hefty guy makes hummus, date bars, sauces, etc. It's the bomb. I use this weekly for my hummus (way cheaper than store bought) that I take to work (will post recipe soon). This chops veggies, slices potatoes, and so much more. There are some neat attachments I haven't tried yet, but my hibernation begins during winter when I only leave the house for work, groceries or wine, so that's probably a good time to try them out, right? I will report back. 

Image via google


3. A Great Set of Knives A great chef, ahem....like myself, should always have a great set of knives. We have this set of Henckels. The key to a great, efficient knife is keeping it sharp. When you have a dull knife, you will know, that crap is majorly annoying. You technically should get your knives sharpened every few months or so. Which reminds me....

Also, I know these aren't the best of the best kind of knives around - but they work great for us and we try to take good care of them- which reminds me again....need to get these sharpened...
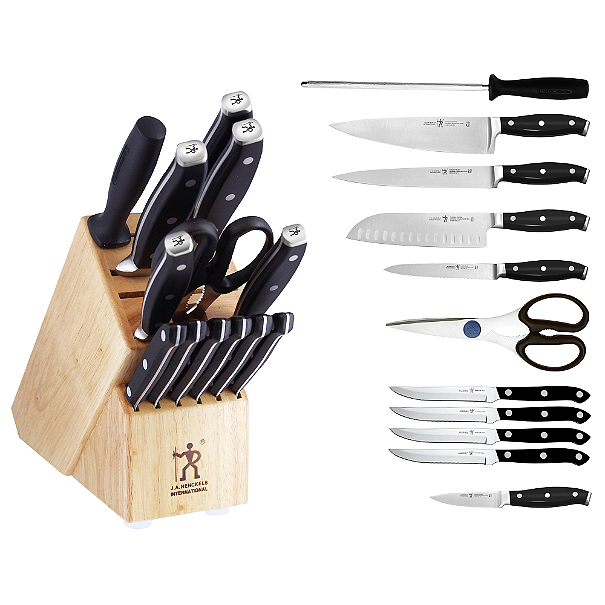
Image via Bed Bath and Beyond

4. A Non-Stick Pan. Seriously, one of the better "As Seen on TV" items I've encountered. I've said before, we are suckers for any "As Seen on TV" items.  This pan cooks eggs like a DREAM. Omelettes, no problem. Pancakes? Check. This is a great pan for $20. I'm sure there are *better* pans out there, but this one fits us just fine!
As Seen On TV Orgreenic 10" Ceramic Interior Non-Stick Fry Pan
Image via Target
5. Spider This guy is a dream for deep frying, pasta retrieval, grabbing veggies from boiling water, etc. I recently picked this up after a marathon browsing session at Williams-Sonoma. I could spend days in there, just can't spend all the monies. Boo. But, for $15, I had to have it.

Image via Williams-Sonoma

*update: I realize I say "like a dream" alot. I'm not even sorry about it.

Thursday, October 2, 2014

Homemade Granola Bars

These 'granola' bars are so. freakin. good.


These are inspired by the Paleo Mom Chewy Granola Bars. I have changed some ingredients to accommodate an almond-free diet. I actually think these turn out better using peanut butter since there is more oil in PB than almond butter to hold them all together.  Also these are *technically* not granola bars, more 'nut bars'.

I recently made these without coconut flakes and coconut oil adding cranberries and golden raisins instead and they were super delish. So, if you have a coconut allergy, these will still work. Nut allergy? Erm, not so much - but you can check these out and be just as satisfied.

This recipe is adapted from the Paleo Mom. She has great paleo recipes that are fairly easy to make and are really delicious.

Recipe: Makes 12-15 bars depending on how you want to cut them:

1/3 pepitas - roasted and salted(shelled pumpkin seeds - I found these in the bulk section at a specialty grocer) pulsed
1/3 c sunflower seeds - roasted and salted
1 1/2 c walnuts - chopped
1 tbsp sesame seeds
1/2 c garbanzo bean flour (trust)
1 tbsp ground flax seed + 1 1/2 tbsp water (mix and set aside to make a "flax goop")
1/3 c coconut oil (coconut free use red palm oil) melted
1/4 c peanut butter
1/4 c honey
3/4 tsp baking soda
3/4 c Enjoy Life chocolate chips
2 c coconut flakes (coconut free use 1 c dried cranberries, 1 c golden raisins - or any dried fruit you prefer chopped up)

Preheat the oven to 325.

Mix together flax seed and water  in small bowl and set aside to make a "flax goop"
Pulse pepitas in food processor or magic bullet a few times to break them up, set aside - if you don't have a processor or magic bullet, just use a knife and

In a large bowl, whisk together peanut butter, flax goop, coconut or palm oil, and honey.
Add garbanzo bean flour and baking soda and mix into paste.

Add in the nuts, coconut (or dried fruit), seeds, chocolate chips and stir together. I use a wooden spoon and use some arm work with this - make sure you mix very very well.

I buy the aluminum 9x13 pans  at the grocery store to put these in, but you can use your own 9x13. You will want to spray non-stick spray into pan first, then spread evenly. I use a piece of parchment paper and use my hands to press down on the mixture to make it stick together and flatten.

You will bake these for 22 minutes. After you get out of the oven, let cool on stovetop or in fridge. They will harden better in the fridge and make it easier to cut into bars.

Try not to eat all of them at once. These are killer.


Monday, September 22, 2014

Kitchen Reveal!

Finally! Seven weeks later: It's done! We are so happy with the results. Here are some before and afters.


 There were 2 pantries in the kitchen on each side of the desk - so we kept one and could do without the other.  So where we were losing counter space with the U-shaped area, we gained it back and then some with moving the fridge and adding a "bar" type area to where the original pantry was.


I'm really glad I no longer have a "drop spot" to throw all my junk - the desk was ALWAYS an eye sore.


We added more storage by removing the soffits and taking the cabinets all the way to the ceiling. Added recessed lighting brightens the entire place up! There used to be 2 boob lights in there.


Such. An. Improvement!  See the black table? Found some test pots of a soft gray color - felt really crafty for a week, but painting furniture is TEDIOUS. So, when you come over, don't look too closely........ ;-)

A few luxuries that I realize now I'm not sure how I lived without: ice maker, spray nozzle on the kitchen sink, and water from the fridge.


Now enjoying a beautiful first day of fall with the windows open!

Shrimp and Weisenberger Grits

Do yourself a huge favor and make this soon. Perfect comfort food for fall, a great "date night at home", or just because you feel like being fancy. These shrimp and grits were one of the best meals I've ever made, and it only took right around 30-35 minutes to make.


I started off frying off bacon, both for the topping and grease to fry the shrimp in. Everything is better using bacon grease - pancakes especially. Drain the grease off into a container on the side and move pan off the heat. I used a cast iron skillet for frying but you can use whatever your heart desires.

Once I fried up the bacon, I got started on the grits. The package of grits gives standard directions - 4c water to 1 c grits. In my grits, I used 2 cups milk (2% but any will work) and 2 c chicken stock. This is a magical combination. Bring the 4 c of liquid to a simmer then add 1 cup of grits and 1 clove of garlic chopped -the garlic will soften with the grits. Bring to a boil then immediately lower the temperature to low/med. You want to keep an eye on these stirring frequently, and cooking for about 25 minutes. You will feel them tightening up as you stir.  Around 20 minutes in, I covered the grits and let them cook for the last 5 minutes covered up. Remove from heat and add 1/2 c heavy cream and 1 c parmesean cheese (I used grated). You can really use whatever cheese you want. The grits should be thin, but not runny.  To keep warm, you can cover or keep on low heat.  I stirred in a handful of spinach last that wilted down while I cooked the shrimp.

Last step is to cook your shrimp (takes 3-4 minutes).

The only things I seasoned my shrimp with are Old Bay and tabasco sauce. Generously coat your shrimp - you don't have to add salt or pepper since it is in the Old Bay seasoning already.  Pour a little of your reserved bacon grease on the cast iron skillet, and bring heat to medium. Put shrimp on and cook for about 1 1/2 minutes per side or until pink.  Make sure not to overcook your shrimp, because they will also cook a little bit longer when you put them in the hot grits.

Toast up a baguette, top with chopped bacon, and dig in!

Recipe:


Grits recipe from Grits and Greens in Mastering the Art of Southern Cooking by Nathalie Dupree

The Grits:
2 c milk
2 c chicken stock
1 garlic clove
1/2 c heavy cream
1 c grated parmesean
1 c yellow grits (I used Weisenberger)
1 c baby spinach

Bring 2c milk and 2c chicken stock to simmer, add grits and garlic. Cook for 25 minutes, stirring frequently. Cover with 5 minutes to go.  After 25 minutes, stir in heavy cream and cheese. Add more heavy cream if consistency is too thick. It should be loose but not runny. Add salt to taste if desired. Stir in spinach and set aside.

The Shrimp:
1 lb 40-50 shrimp - peeled, deveined, tails off, thawed
2 tbsp Old Bay seasoning
1 tbsp tabasco
4 slices thick cut bacon

Cook bacon and reserve grease - drain bacon on paper towel lined plate.
Bring skillet to medium heat with 2 tbsp bacon grease.
Season shrimp with old bay and tabasco
Place on skillet and cook 1 1/2 minutes on each side until pink.

Pour grits into shallow bowl and add cooked shrimp in the center. Top with bacon and serve.


Serves 4.

Let me know if you make this soon and how you liked it!

Wednesday, September 10, 2014

Kitchen Update Numero Dos

I have not cooked dinner in SIX weeks. SIX. I've read ALL the books, I've binge watched Scandal (hellloooo Tony Goldwyn!), and have done major closet cleaning.

I am itching to cook something. Anything. I want to chop vegetables and use my new sink. I want to preheat my oven!!!! I want to run my dishwasher. Okay, so those aren't technically cooking, but it is the beginning and end of a delicious meal. It is only days away. I can taste the brussels sprouts pizza already.

Here are some pics of whats been happening in the G household.  Big things are happening y'all!

Let's take a look back at the OG:


Back in this post, there were a lot of things happening, but no cabinets were in.

The cabinets were delivered and put up last week.


Hello my pretties! This is prior to crown molding being installed.


This, is after. Sorry for the obscene hand gestures, guys. See how the ceiling looks uneven? Paint and caulk fixes that.
Charming!

 Then, my love named "farmhouse sink" stepped into my life and now I want to sit and stare at her all day long. Oh, the dishes you will clean!


Moving on to this awesomeness! Please note, some things on pinterest actually do come true.  Ask your contractor, and ye shall receive.


That's right, kids. A cutting board over the trash.  Life is good.  We are going to see how we like it without a hole in it and possibly cut one in the future. 

This pic was accidentally uploaded, but how can you resist this sweet face?


Then the painting began. We chose Benjamin Moore Palest Pistachio. It is reallllllly light blue. I am obsessed with how it turned out, because its juust a hint of color. I was thisclose to freaking out when Joey said "oh, they've finished priming the room!" when actually, eeeeeek, it was the paint color I picked out. He now notices the color (or maybe not).


See the clean line at the ceiling and crown molding. The wonders of caulk!


Please tell me you can see the hint of color. You do? NO? Well it is there. Promise.


And here we are! Waiting on fridge and dishwasher, some baseboards, countertops, and electrical work.  These will be all in and done by the middle of next week!


Also, I need some ideas for my first meal to make in the finished kitchen. Give me some ideas. It's gotta be good, and cheap. We outta dollaz over here.

Monday, August 25, 2014

Tore Up From the Floor Up


One of the reasons I have not posted lately other than being incredibly lazy and joining the library (NERD ALERT! Which, by the way, has a fantastic cookbook section) is that we are in the midst of an amazing complete kitchen renovation.


Before

Day 1

Progress after Week 1

In pictures, the previous kitchen doesn't look THAT BAD (or so I have heard from some).  Oh honey, it was BAD. Check out the 80s desk and the soffits. Gorg. Plus, when we moved in, I chose the color and grew to really dislike it.

We first started our journey over a year ago, with a consultation from Don, our project manager. I had no idea what I wanted at the time. Just wanted updated, clean, fresh stuff.  Spoiler alert: a kitchen renovation is not cheap. It's not like, yeah! We have unlimited funds, let's reno the kitchen! Although, le sigh, wouldn't that be nice? So, we got some ideas, a plan was drawn up by Don, and we decided to save our monies to get our dream kitchen.  A long time passes by, and we finally bite the bullet and start getting things done.

So, we are 3 weeks into the renovation. It has certainly been interesting not cooking. I have no idea what to do with my time in the evenings. So, I drink tons of iced coffee, get all wired up and throw out tons of crap we've collected into the large dumpster that has taken residence in the backyard.

Currently, we are at a point of: all new drywall, new ceiling (NO MORE TEXTURE! WAHOOOO!), recessed cans lighting, full flooring and a wide open space.


After Week 2 and 3


 The floor was replaced where it was missing from what was torn out, and that was the last step until the cabinets can come in to live! The floor at this point looks like it doesn't match, but it does, promise. There is SO. Much. Dust.


View from dining room, after floor was replaced.
My cute model, Jade.

So far, so good. More updates are on the way as they happen.